Your application form is an important part of your study permit extension. Missing or incorrect information can negatively impact the outcome of your application. Below are 4 steps to help create a comprehensive application.
Step 1. Download the newest form
Use the Application for a Study Permit Made Outside of Canada [IMM 1294] form.
IRCC makes periodic updates to their application forms. Always make sure you are using the most current application form by downloading the application form from your Document Checklist on your IRCC online account.

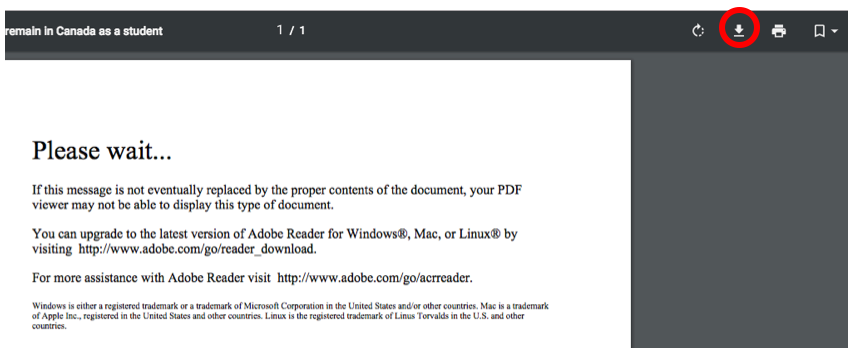
If you see the “Please wait…” message when downloading the form
Click on the download arrow at the top right to save the file onto your computer, such as in your documents folder or desktop, and then open it from where you saved it on your computer with Adobe Reader. You will not be able to open it from a browser. If you do not see the arrow, move your cursor to the top of the screen and it will appear.

Step 2. Get help with commonly asked questions
What is a UCI?
UCI stands for “Unique Client Identifier,” also known as “Client ID.” It is an eight-digit or ten-digit number. If you do not have a UCI, leave this section blank.

What is UBC’s Designated Learning Institution (DLI) number?
UBC's DLI is O19330231062. It starts with the letter "O" and not zero.

How do I answer “Duration of expected study”?
- In the "From" field: use the "Program Start Date" shown on your Letter of Acceptance.
- In the "To" field: Use a date up to 90 days after your anticipated program completion date.

How do I fill out the "the cost of my studies" section?
Provide information on your expenses including your first-year tuition fees, rent and food, travel expenses, and other estimated costs for one year.
You can use these two cost calculators to help you:

Note: exchange students should indicate ‘$0’ in the ‘tuition’ field as you will not pay tuition fees to UBC, you will pay your home university. Include a letter of explanation to address your tuition fees as an inbound exchange student and provide supporting documents, if available. One-term exchange students may provide estimated costs based on one term only and prorate the cost-of-living amount.
How do I fill out the "funds available for my stay" section?
The amount you indicate in “Funds available for my stay (CAD)” should match the total amount of funds you are showing as proof.
For example, if you have a combination of $20,500 in your bank account, $10,000 from your scholarship, and $33,040 from your parents, you would indicate $63,540.
Remember you must show that you have enough funds to cover your first year tuition fees, travel expenses, and the minimum for cost-of-living expenses:
- For applications submitted on or before December 31, 2023: at least $10,000 Canadian Dollars (CAD), plus an additional $4,000 for a spouse/partner, and/or $3,000 for each additional dependent family member (such as a child).
- For applications submitted January 1, 2024, or later: at least $20,635 for the cost-of-living financial requirement in 2024. The cost-of-living amount will be adjusted each year based on Statistics Canada’s low-income cut-off. The amount required for additional family members depends on how many dependents you have.

How do I fill out the "Employment" section?
The information you provide in this section helps IRCC have a fuller picture of your activities within the last ten years:
- Include all part-time and full-time jobs as well as any internships and practicum placements, even if they were unpaid.
- Under “current activity”, if you are not currently working/employed, but you are a student, write “student” as activity and your school name as “employer”. Your ‘to’ date can be the month and year of your study permit application; for example, if you are applying in April 2022, indicate this in your ‘to’ field.
- If you are working at the time of application, write the month and year of your application submission as your ‘To’ date.
- Fill out the form in chronological order, with the most recent job first.
- If you need more space, provide additional information in a Letter of Explanation.
How do I answer "Background" questions?
It is very important to carefully read these questions and answer truthfully and honestly.
Please contact International Student Advising if you answered “yes” to any of the questions so that you are aware of possible implications.
Important: If you have previously applied for a Canadian study permit, a Temporary Resident Visa (TRV), a work permit, or permanent residence, whether it is approved or rejected, you must report it to IRCC by checking the box "Yes" on 2(c) and writing down when you applied for each type of document in the box in addition to any details.
How can I sign the form if I apply online?
You do not need to sign your name in the signature field on the bottom of page 5, but you will need to type in the date of your application if applying online. Upload the form without signing.
- After uploading all your documents, you will be asked to electronically sign your application by typing your name.
- Do not print and sign the form because you will not be able to upload it to the site.
Step 3. Validate your form
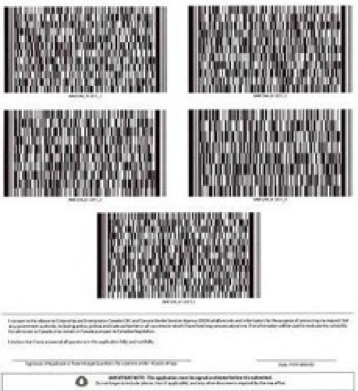
When you finish filling out your application form, click the blue “Validate” button (found on the first or last page). This will highlight any missing information that is required and create an additional page with barcodes.
- You can make changes after the application is successfully validated - just remember to validate again.
- You can edit and validate as many times as you need.
Once your application has been successfully validated, it will show the following:

If you don’t see any barcodes when you validate your application, please visit the CIC help page.
Step 4. Review the Canvas course
Sign up for the initial study permit application review Canvas course to go over required documents, learn how to fill out the form, avoid common mistakes, and be ready to submit your application.
Step 5. If applying online, take screenshots as you apply
In case there are issues with your application submission, take screenshots of these screens:
- The "Your document checklist" page after all your documents have been successfully uploaded to your IRCC online account.
- The "Acknowledgment of receipt" page after the application has been submitted.
- After uploading or submitting any ‘after-the-fact’ documents that an IRCC officer has requested after your original application has been submitted.
Save your screenshots to a safe place where you can access them easily.
Learn how to take screenshots if you're using a PC or on your Mac.
